The recipe for this peach cake was developed for my youngest son. He has always enjoyed fruit pies, cobblers and Kuchens. Kuchen is the German word for cake. My mother would make fruit Kuchens with whatever fresh fruit we had picked that week.
This cake has a nice moist crumb with an almond, lemon flavor. With every bite you get the delicious flavor of peach. You could just as easily chop the peaches and stir them into the batter, but we like the slight caramelization that the peaches get when they are baked on top of the batter.

Summer is the season of sweet peaches, and there’s no better way to celebrate peach season than with a delicious peach cake. This easy peach cake recipe will become a favorite for peach lovers, offering a moist crumb and a burst of juicy peaches in every bite. Whether you’re using fresh peaches, canned peaches, or a mix of both, this dessert recipe guarantees the best results. Let’s dive into the steps to create this perfect dessert for your summer gatherings!
Why You’ll Love This Peach Cake Recipe
-
Versatility: Use fresh, canned, or even sliced peaches to suit your preferences.
-
Moist Crumb: Sour cream and melted butter ensure a fluffy cake texture that stays moist.
-
Perfect for Peach Season: This recipe highlights the best flavor of sweet peaches in every bite.


Ingredients for Fresh Peach Cake
- Flour: Forms the base structure of the cake.
- Sugar: Sweetens the cake and aids in moisture retention.
- Baking Powder: Leavens the cake, ensuring it rises properly.
- Salt: Enhances the flavors of the other ingredients.
- Milk: Adds moisture and contributes to a tender crumb.
- Sour Cream: Provides moisture and a slight tang, resulting in a tender crumb.
- Butter: Adds richness and flavor to the cake.
- Egg: Binds the ingredients together and adds structure.
- Vanilla Extract: Enhances the overall flavor with a sweet aroma.
- Almond Extract: Adds a subtle nutty flavor that complements the peaches.
- Lemon Zest: Introduces a fresh citrus note that brightens the cake’s flavor.
- Fresh Peaches: The star ingredient, providing natural sweetness and juiciness.
- Lemon Juice: Prevents the peaches from browning and adds a tangy contrast.
- Coarse Sugar: Sprinkled on top for a delightful crunchy texture.
Instructions:
- Preheat Oven: Set to 350°F (175°C). Line a baking dish with parchment paper and lightly grease it.
- Prepare Dry Ingredients: In a bowl, combine flour, sugar, baking powder, and salt.
- Combine Wet Ingredients: In the same bowl, add the egg, milk, sour cream, melted butter, vanilla extract, almond extract, and lemon zest. Mix until just combined; the batter will be slightly thick.
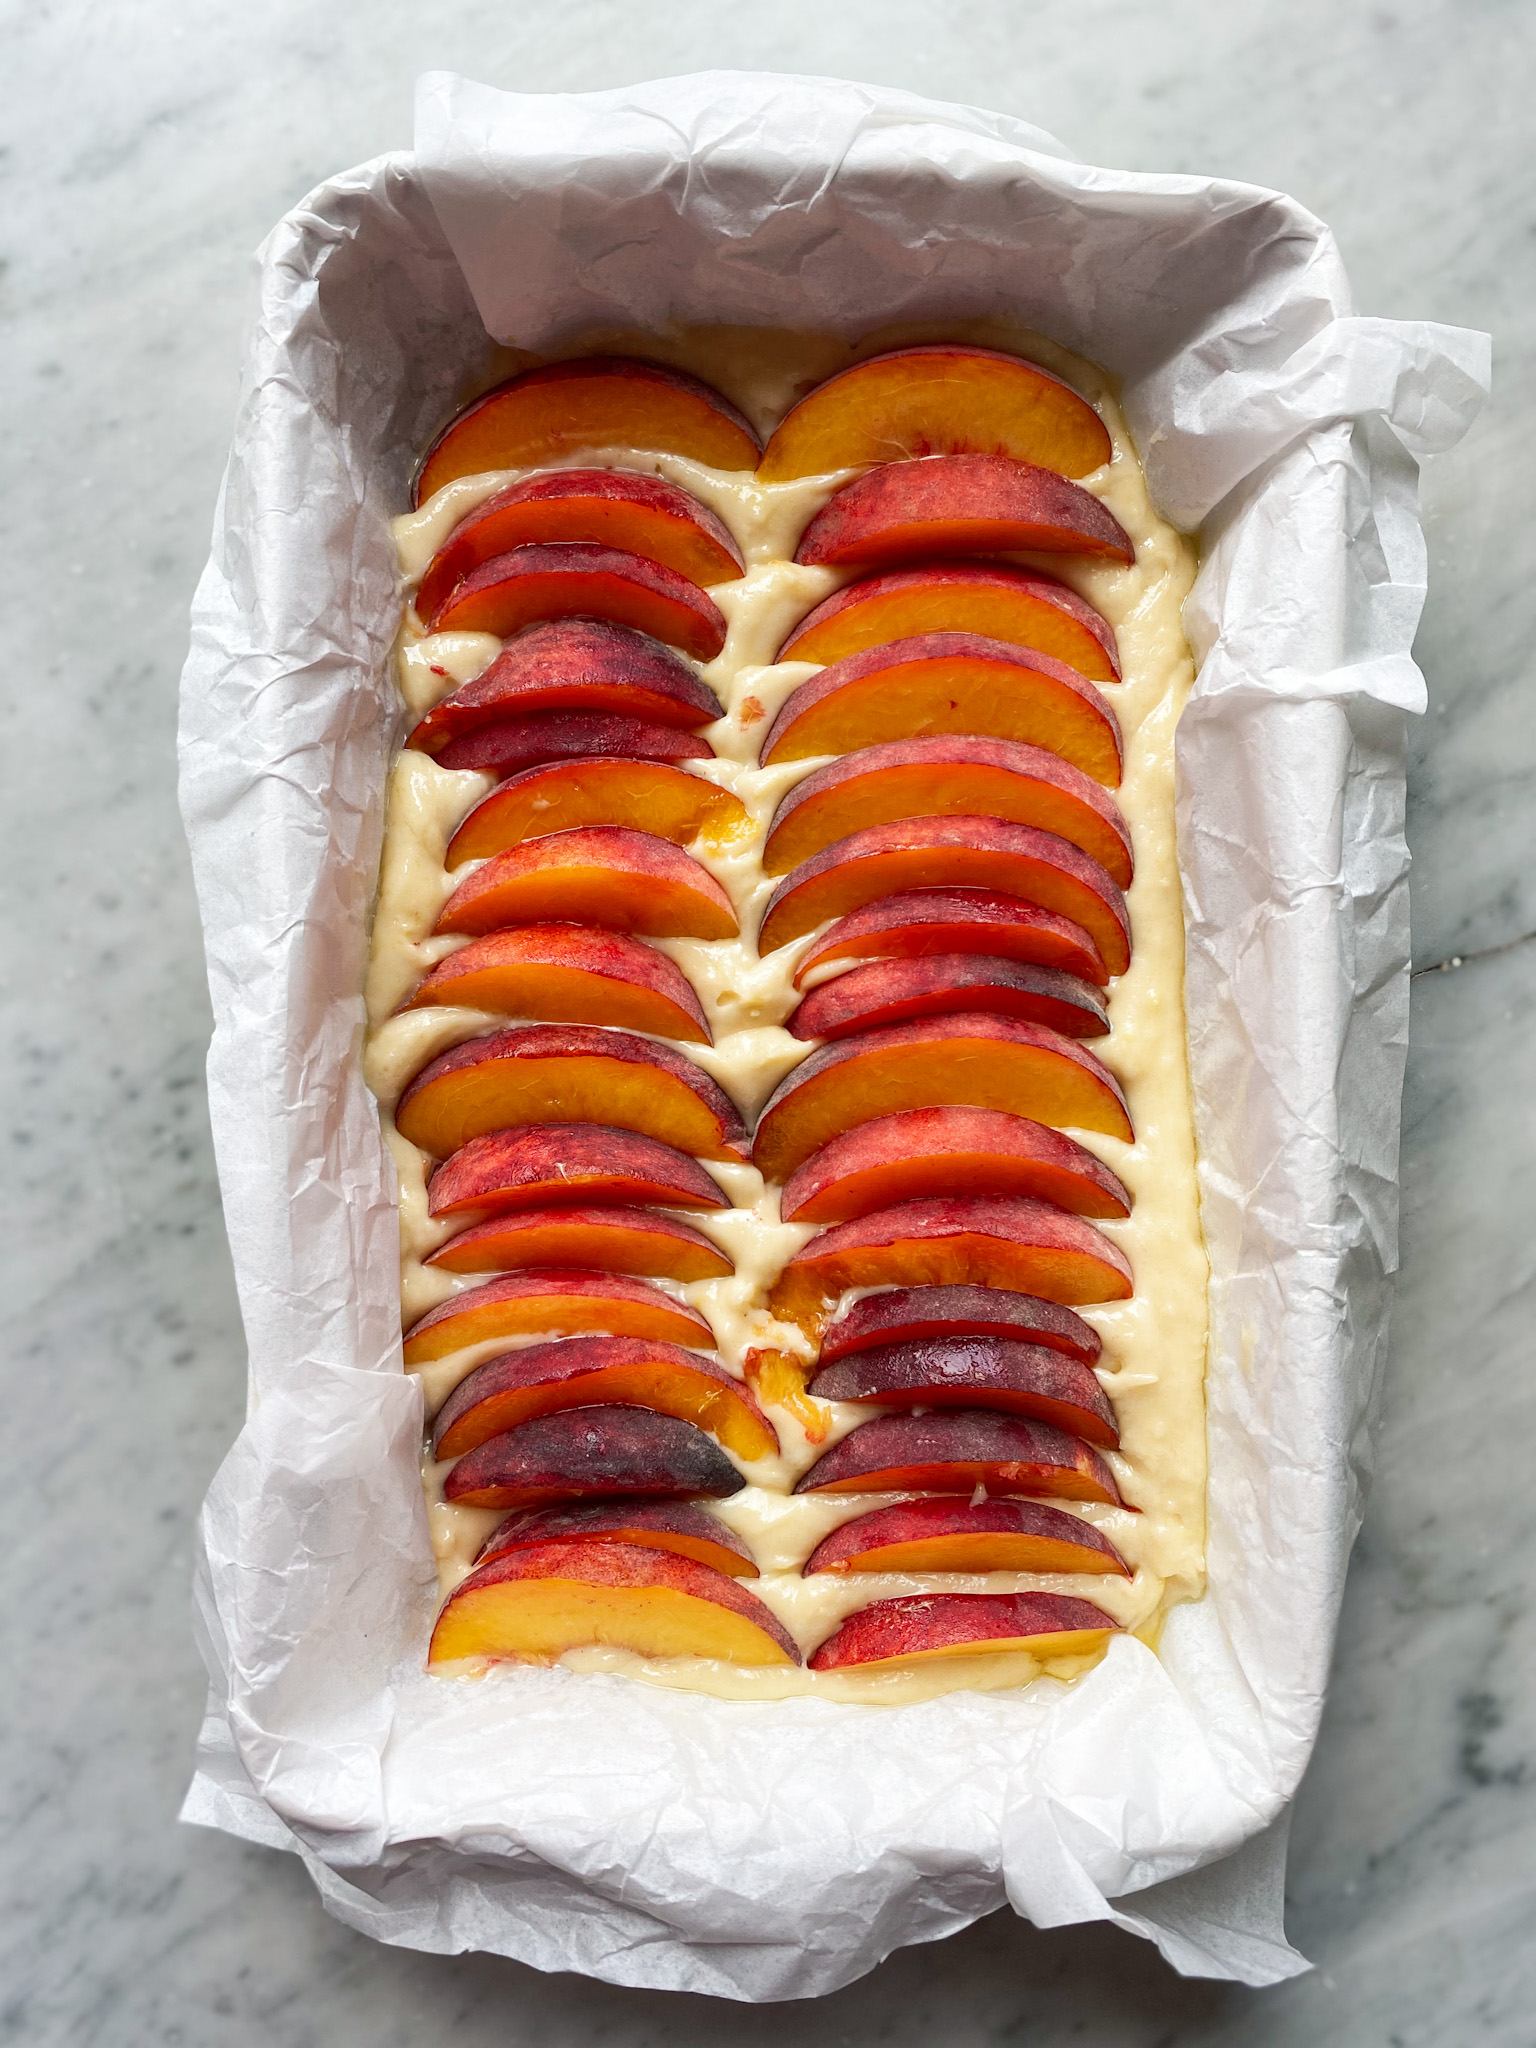
- Assemble Cake: Spread the batter evenly in the prepared pan. Arrange sliced peaches on top, slightly pressing them into the batter.
- Add Toppings: Drizzle melted butter mixed with lemon juice over the peaches. Sprinkle coarse sugar on top.
- Bake: Place in the preheated oven and bake for 20 minutes. Rotate the pan and continue baking for an additional 20-25 minutes, or until a toothpick inserted into the center comes out clean and the peaches are golden brown.
- Cool and Serve: Remove from the oven and allow to cool. Serve warm or at room temperature.
Three Reasons You’ll Love This Recipe:
- Seasonal Delight: Perfect for showcasing fresh, juicy peaches at their peak.
- Balanced Flavors: The combination of almond and lemon zest enhances the natural sweetness of the peaches.
- Versatile Serving Options: Enjoy it warm with a scoop of vanilla ice cream or at room temperature with a dollop of whipped cream.
Storage:
- Room Temperature: Store in an airtight container for up to 2 days.
- Refrigeration: Keep in the refrigerator for up to 5 days. Bring to room temperature or gently warm before serving.
- Freezing: Wrap individual slices in plastic wrap and place in a freezer-safe container. Freeze for up to 2 months. Thaw in the refrigerator overnight and warm before serving.
Enjoy baking and savoring this delightful peach cake!

Ingredients
Instructions
- Pre-heat oven to 350 degrees. Spray a sheet of parchment with oil and place into a small baking dish.
- Measure dry ingredients into a bowl. Whisk slightly to mix. Move the dry ingredients to one side of he bowl, and crack an egg into other side, and whisk. Add milk, sour cream, vanilla, and almond extract. Zest a lemon into the bowl. Stir mixture together. It will be slightly thick.
- Spread the cake batter into the parchment lined pan, and sit aside while you prepare the peaches.
- Wash peaches and remove any peach fuzz from skin by rubbing with a dish towel. Using the indentation as a guide, slice the peaches in half and remove the pits. Slice evenly into slices. Arrange peaches on top of cake, creating a pattern. I make 2 rows as I use a rectangular dish. If you choose to use a round pan, you can create a circular pattern with the peaches. Make sure to overlap them. Once all the peaches are on the cake, slightly press them into the batter.
- Melt the butter and add the lemon juice. Drizzle this over the peaches. Sprinkle with 3 tablespoons of course sugar.
- Bake for 20 minutes, then rotate the pan and bake for another 20-25 minutes. You want a toothpick to come out clean, and a nice golden brown on the peaches.
- Remove peach cake from oven, and allow to cool. Serve warm or at room temperature.
Nutrition
If you love peach desserts, give these a try!
Peach Cheesecake
Peach Cobbler Rolls with Peach Cream Cheese Frosting
Peaches-N-Cream Gluten-Free Dessert
Peach Mango Pie
Peach Galette with Almond-Infused Cream Cheese
Peach Mango Pie


Making Cinnamon Rolls: A Step-by-Step Guide
Preparing the Dough:
- Activate the Yeast: Begin by whisking the yeast into warm milk and letting it sit for 3-4 minutes. This step helps to activate the yeast, ensuring your dough will rise properly.
- Mix the Dry Ingredients: In a large mixing bowl, combine the flour, salt, and sugar.
- Blend the Wet Ingredients: Whisk together the eggs and melted butter, then mix them into the milk and yeast mixture.
- Form the Dough: Gradually pour the wet ingredients over the dry ingredients, stirring until the dough comes together. A firm rubber spatula or plastic bench scraper can be particularly useful for this step.
- Knead the Dough: Once the dough has formed, transfer it to a lightly floured surface. Knead it gently for about 3-4 minutes until it becomes firm but still slightly sticky.
- Let the Dough Rise: Lightly oil a large bowl and place the dough inside. Cover it with a damp dish towel and let it rise in a warm place for about 1 hour, or until it has doubled in size.
Making the Filling:
- Mix the Filling Ingredients: Combine brown sugar and cinnamon in a medium bowl. Hold off on preparing the apples until you’re ready to assemble the rolls to prevent browning.
- Prepare the Apples: When you’re ready to roll out the dough, core, peel, and chop the apples into bite-sized cubes.
Assembling the Cinnamon Rolls:
- Roll Out the Dough: Transfer the risen dough onto a lightly floured surface. Use a rolling pin to roll it into a rectangle.
- Add the Butter: Spread the softened butter evenly over the dough. I find that using my hands makes this step easier.
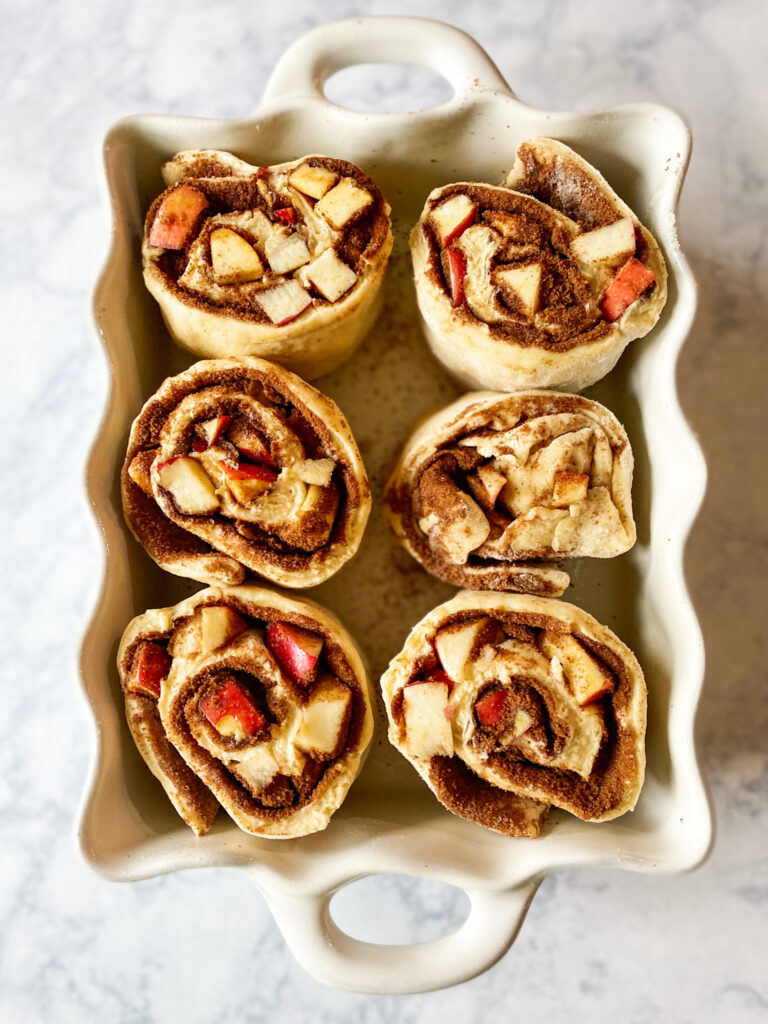
- Add the Filling: Sprinkle the brown sugar mixture over the butter, leaving one edge free of filling. Evenly distribute the apple pieces over the dough.
- Roll the Dough: Starting from the long side, tightly roll up the dough, tucking in the ends as you go. Slice the roll into 12 equal pieces.
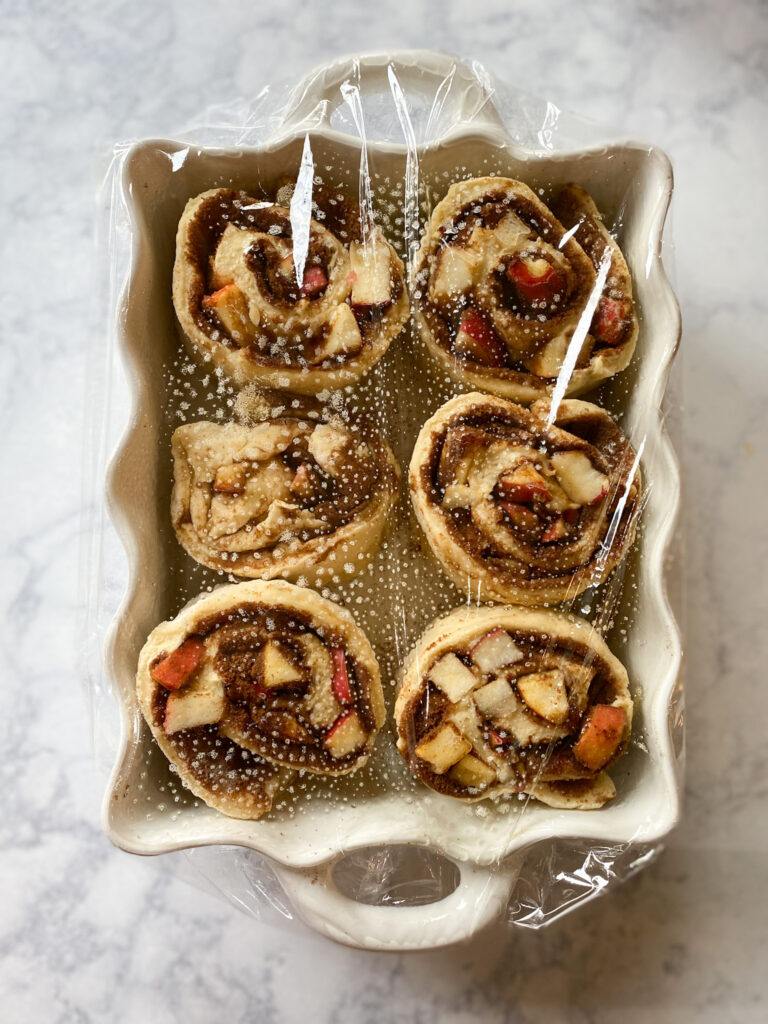
- Prepare for Baking: Arrange the rolls in a greased 9×13 baking pan. Cover them with plastic wrap that has been sprayed with oil. Allow the rolls to rise for about 1 hour, or until nearly doubled in size.
Baking the Cinnamon Rolls:
- Preheat the Oven: Set your oven to 375°F (190°C).
- Prepare the Cream: Warm the heavy cream slightly. After the rolls have risen, pour the cream over the top, allowing it to soak down and around the rolls.
- Bake: Place the rolls in the oven and bake for 20-22 minutes, rotating the pan halfway through. If the rolls begin to brown too quickly, cover them loosely with foil. Depending on your oven and the size of the rolls, baking may take up to 30 minutes.
Making the Frosting:
- Blend the Ingredients: In a medium mixing bowl, use a hand or stand mixer to blend the softened cream cheese and butter until smooth.
- Add the Sugar: Gradually mix in the powdered sugar.
- Finish with Vanilla and Cream: Add vanilla extract and enough cream to achieve your desired frosting consistency. Once the rolls are warm but not too hot, generously spread the frosting on top.
Enjoy your homemade cinnamon rolls! The combination of the sweet cinnamon filling, tender apples, and creamy frosting makes for an irresistible treat.
- Cream cheese: Adds tangy richness that balances the sweetness of the rolls.
- Salted butter: Enhances the creamy texture and flavor of the frosting.
- Powdered sugar: Sweetens the frosting and gives it a smooth, silky finish.
- Vanilla extract: Adds warmth and depth to the flavor.
- Heavy cream or half and half: Helps achieve the perfect creamy consistency.
You will want to start the dough when you get up to allow to proof. Once you roll them out, fill them and slice them you can let them rise while you go to the grocery store, or relax and read the paper.
Why you will love making this New York bagel recipe at home:
1. Superior Freshness and Quality
- Fresh Ingredients: When you make New York bagels at home, you have control over the ingredients, ensuring that they are fresh and high-quality. This results in bagels that are fresher and often superior in taste and texture compared to store-bought versions.
- Customizable Flavors: You can experiment with different types of flour, toppings, and add-ins to create unique flavor combinations that you might not find in commercial bagels. This customization allows you to tailor the bagels to your personal preferences.
2. Mastering Traditional Techniques
- Boiling and Baking: The process of making New York-style bagels involves boiling the dough before baking, which gives the bagels their characteristic chewy texture and shiny crust. Mastering this traditional technique can be a satisfying culinary achievement.
- Learning and Sharing: Making bagels from scratch can be a fun and educational experience, whether you’re baking alone or with family and friends. It’s a great way to learn more about baking and share the joy of homemade goods with loved ones.
3. Sense of Accomplishment and Enjoyment
- Homemade Delight: There’s a unique satisfaction that comes from making something from scratch. Enjoying a warm, freshly baked bagel that you’ve made yourself can be incredibly rewarding.
- Creative Process: Baking can be a therapeutic and creative outlet. Shaping the dough, choosing toppings, and watching your bagels come to life in the oven can be a delightful and stress-relieving process.
By making New York City-style bagels at home, you can enjoy the superior taste of fresh, high-quality bagels, master traditional baking techniques, and experience the joy and satisfaction of creating something delicious from scratch.
Making homemade bagels might seem daunting, but with this detailed new york style bagel recipe, you’ll be able to bring the taste of New York City into your own kitchen. Whether you enjoy your bagels plain, topped with sesame seeds, or slathered in cream cheese, these homemade bagels are sure to impress. Next time you’re craving a chewy bagel with a crisp exterior, skip the grocery store and try this recipe instead. Happy baking!

I love any dessert with peaches in them! I can’t wait to make this cake this weekend!
This is the perfect summer cake!