There’s nothing like baking your own simple sourdough bread at home. With just four ingredients, a little patience, and the magic of natural fermentation, you’ll create a crusty loaf of sourdough bread that rivals the bakery. Whether this is your first loaf of sourdough bread or your tenth, the process is both rewarding and delicious.
Published August 23, 2021
Modified August 31, 2025
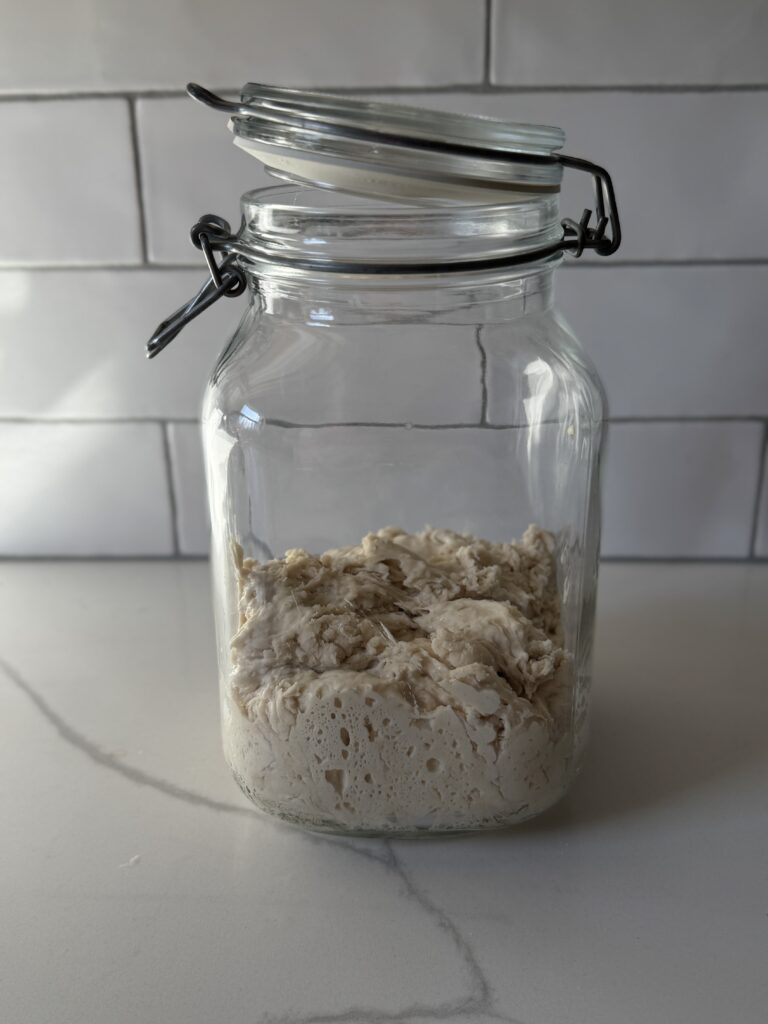
Making sourdough bread is a two-day process that begins with one key ingredient: a sourdough starter. If you don’t already have one, ask friends or family who bake—most will happily share! We made our sourdough starter over 5 years ago!! Yep, still the same one we started with!
When we baked our first sourdough loaf, it was so dense it could have doubled as a paperweight. (We’re pretty sure the squirrels outside weren’t impressed either.) But don’t give up—it takes a few bakes to get it just right. There are so many variables.
The secret to sourdough success is precision and quality ingredients. You only need four: flour, water, starter, and salt. We recommend using King Arthur Flour—we once substituted with a bargain brand and noticed the difference right away.
Why you’ll love making weekend sourdough bread:
-
Time to Let It Rise
-
Sourdough is all about slow fermentation. On weekends, you have the flexibility to stretch out the process without feeling rushed.
-
You’ll love how the dough transforms over hours into something light, airy, and flavorful.
-
-
Therapy in the Kitchen
-
Mixing, folding, and shaping dough is calming and hands-on, a break from your busy work week. The relaxing rythym of the folding and prepping will ease your mind.
-
You’ll love the satisfaction of creating something beautiful (and delicious) with just flour, water, and salt.
-
-
Fresh-Baked Aroma & Taste
-
Few things beat the smell of fresh sourdough filling your home on a weekend morning.
-
You’ll love that first slice—crispy crust, chewy center, tangy flavor—better than most bakery loaves.
-
-
Sharing is Caring:
-
A weekend bake gives you enough bread to share with family, friends, or neighbors. Bruce always makes a double batch, so we have loaves to share with friends!!
-
Ingredients:
-
Bread flour (or all-purpose flour) – A higher protein content flour develops gluten for structure and chew. You can also mix in whole wheat flour or whole grain flour for flavor and nutrition. Using organic flour can improve taste and consistency.
-
Warm water – Helps activate the starter and gluten formation. The ambient temperature and temperature of your kitchen affect the fermentation process.
-
Active sourdough starter – A bubbly, active starter is your natural leavening. Test it with the float test—a spoonful should float in water when it’s ready.
-
Sea salt – Balances flavor, strengthens gluten, and regulates the bread rise during bulk fermentation.
Step-by-Step Instructions
Day 1: Mixing & Bulk Fermentation
-
In a large bowl, dissolve your active sourdough starter into warm water using a whisk or wooden spoon.
-
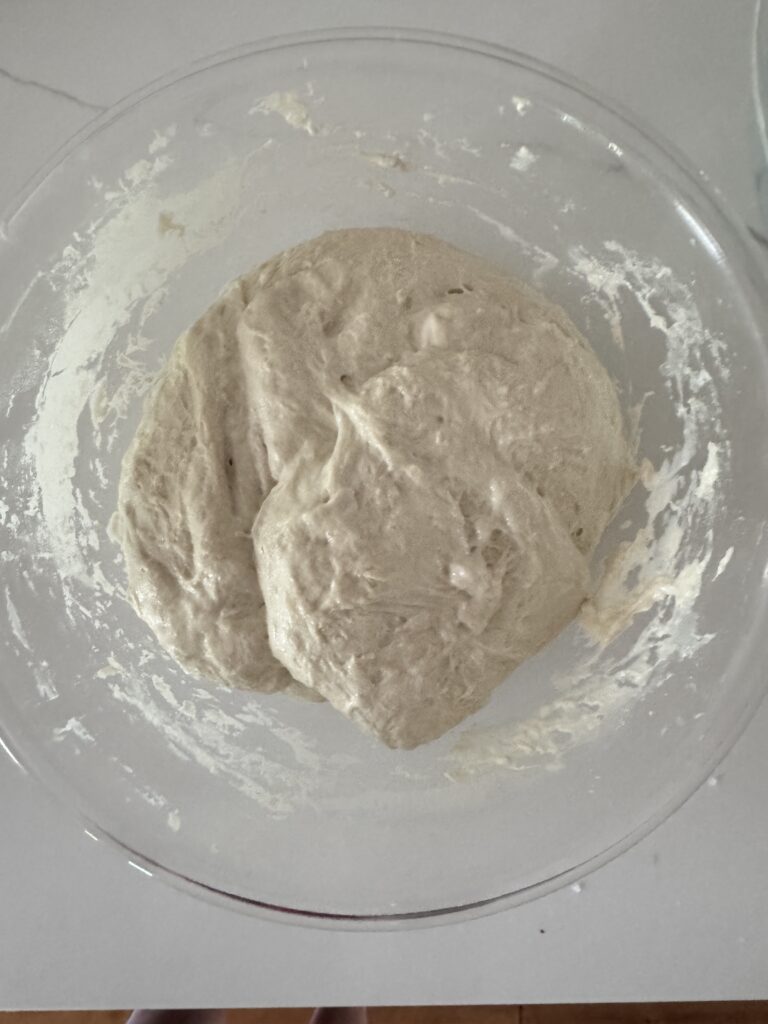
Stir in the flour until no dry bits remain. Scrape down the sides of the bowl. Cover and let the dough rest for 1 hour. At this point it will look scraggly, not smooth, but do not worry.
-
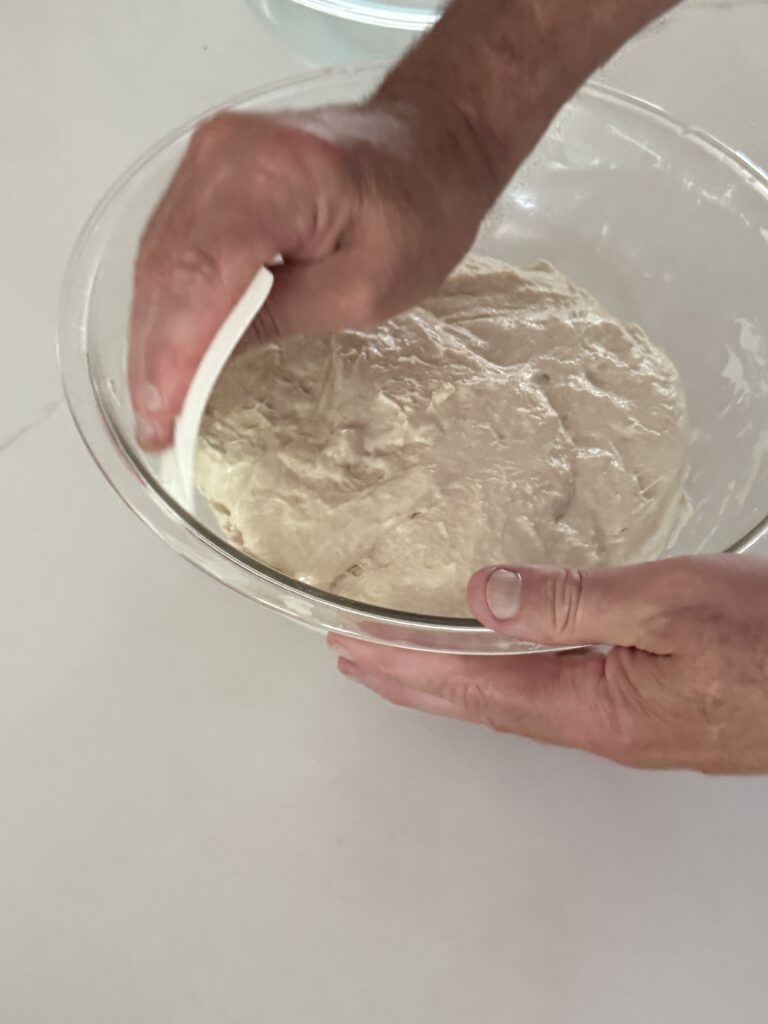
Sprinkle salt over the top of the dough. With wet hands, stretch a corner of the dough up and fold into the center. Give the bowl a quarter turn and repeat until you’ve folded all four sides. Cover and rest for 30 minutes.
-
Repeat this series of folds five more times for a total of six, resting 30 minutes between each. This stage—called bulk fermentation—develops strength and flavor.
-
Cover with plastic wrap, mark the sides of the bowl with a rubber band to track the bread rise, and refrigerate overnight (12–20 hours). This cold proof enhances flavor.
Day 2: Shaping & Final Rise
-
Turn the dough onto a lightly floured work surface. Use a bench scraper to divide in half for two loaves.
-
Shape each into a ball, building surface tension as you tuck the sides of the dough underneath. Let rest 10 minutes (bench rest).
-
Place seam-side up into floured proofing baskets, or bowls lined with floured tea towels dusted in rice flour. Cover and refrigerate 4–5 hours for the final rise.
Baking Your Sourdough Loaf
-
Preheat oven to 500°F with two Dutch ovens (or a combo cooker) and lids inside for 1 hour.
-
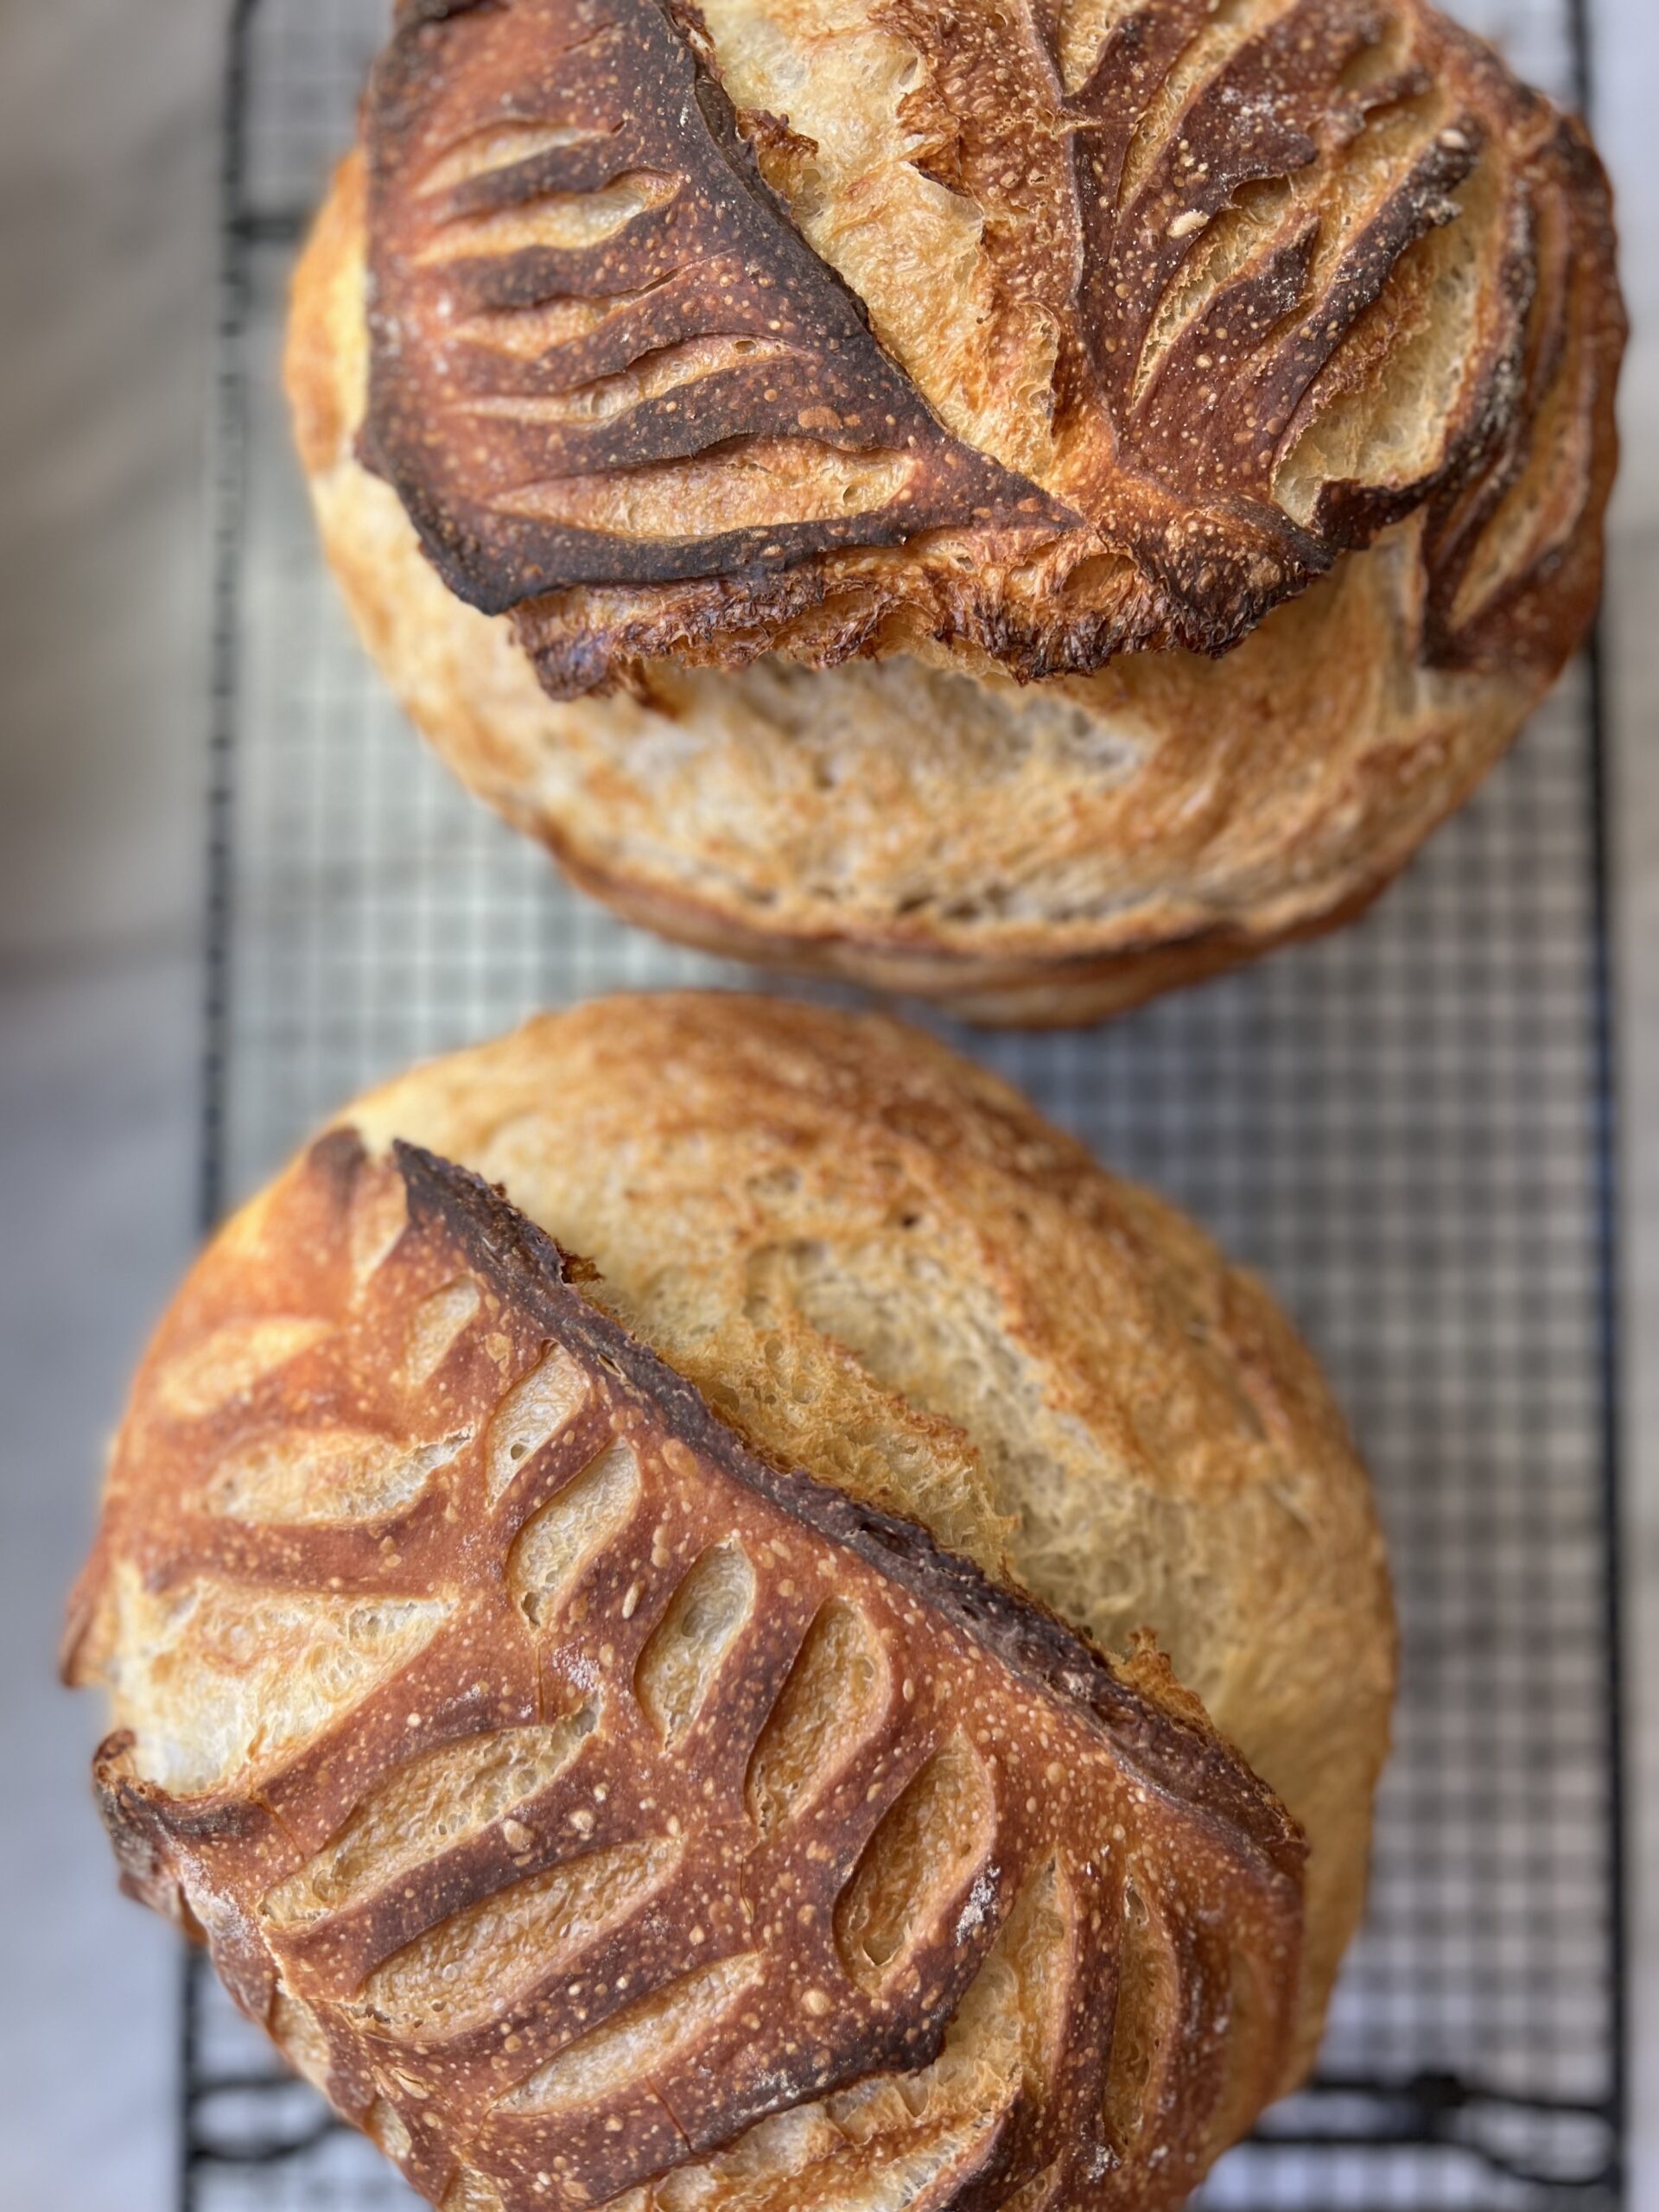
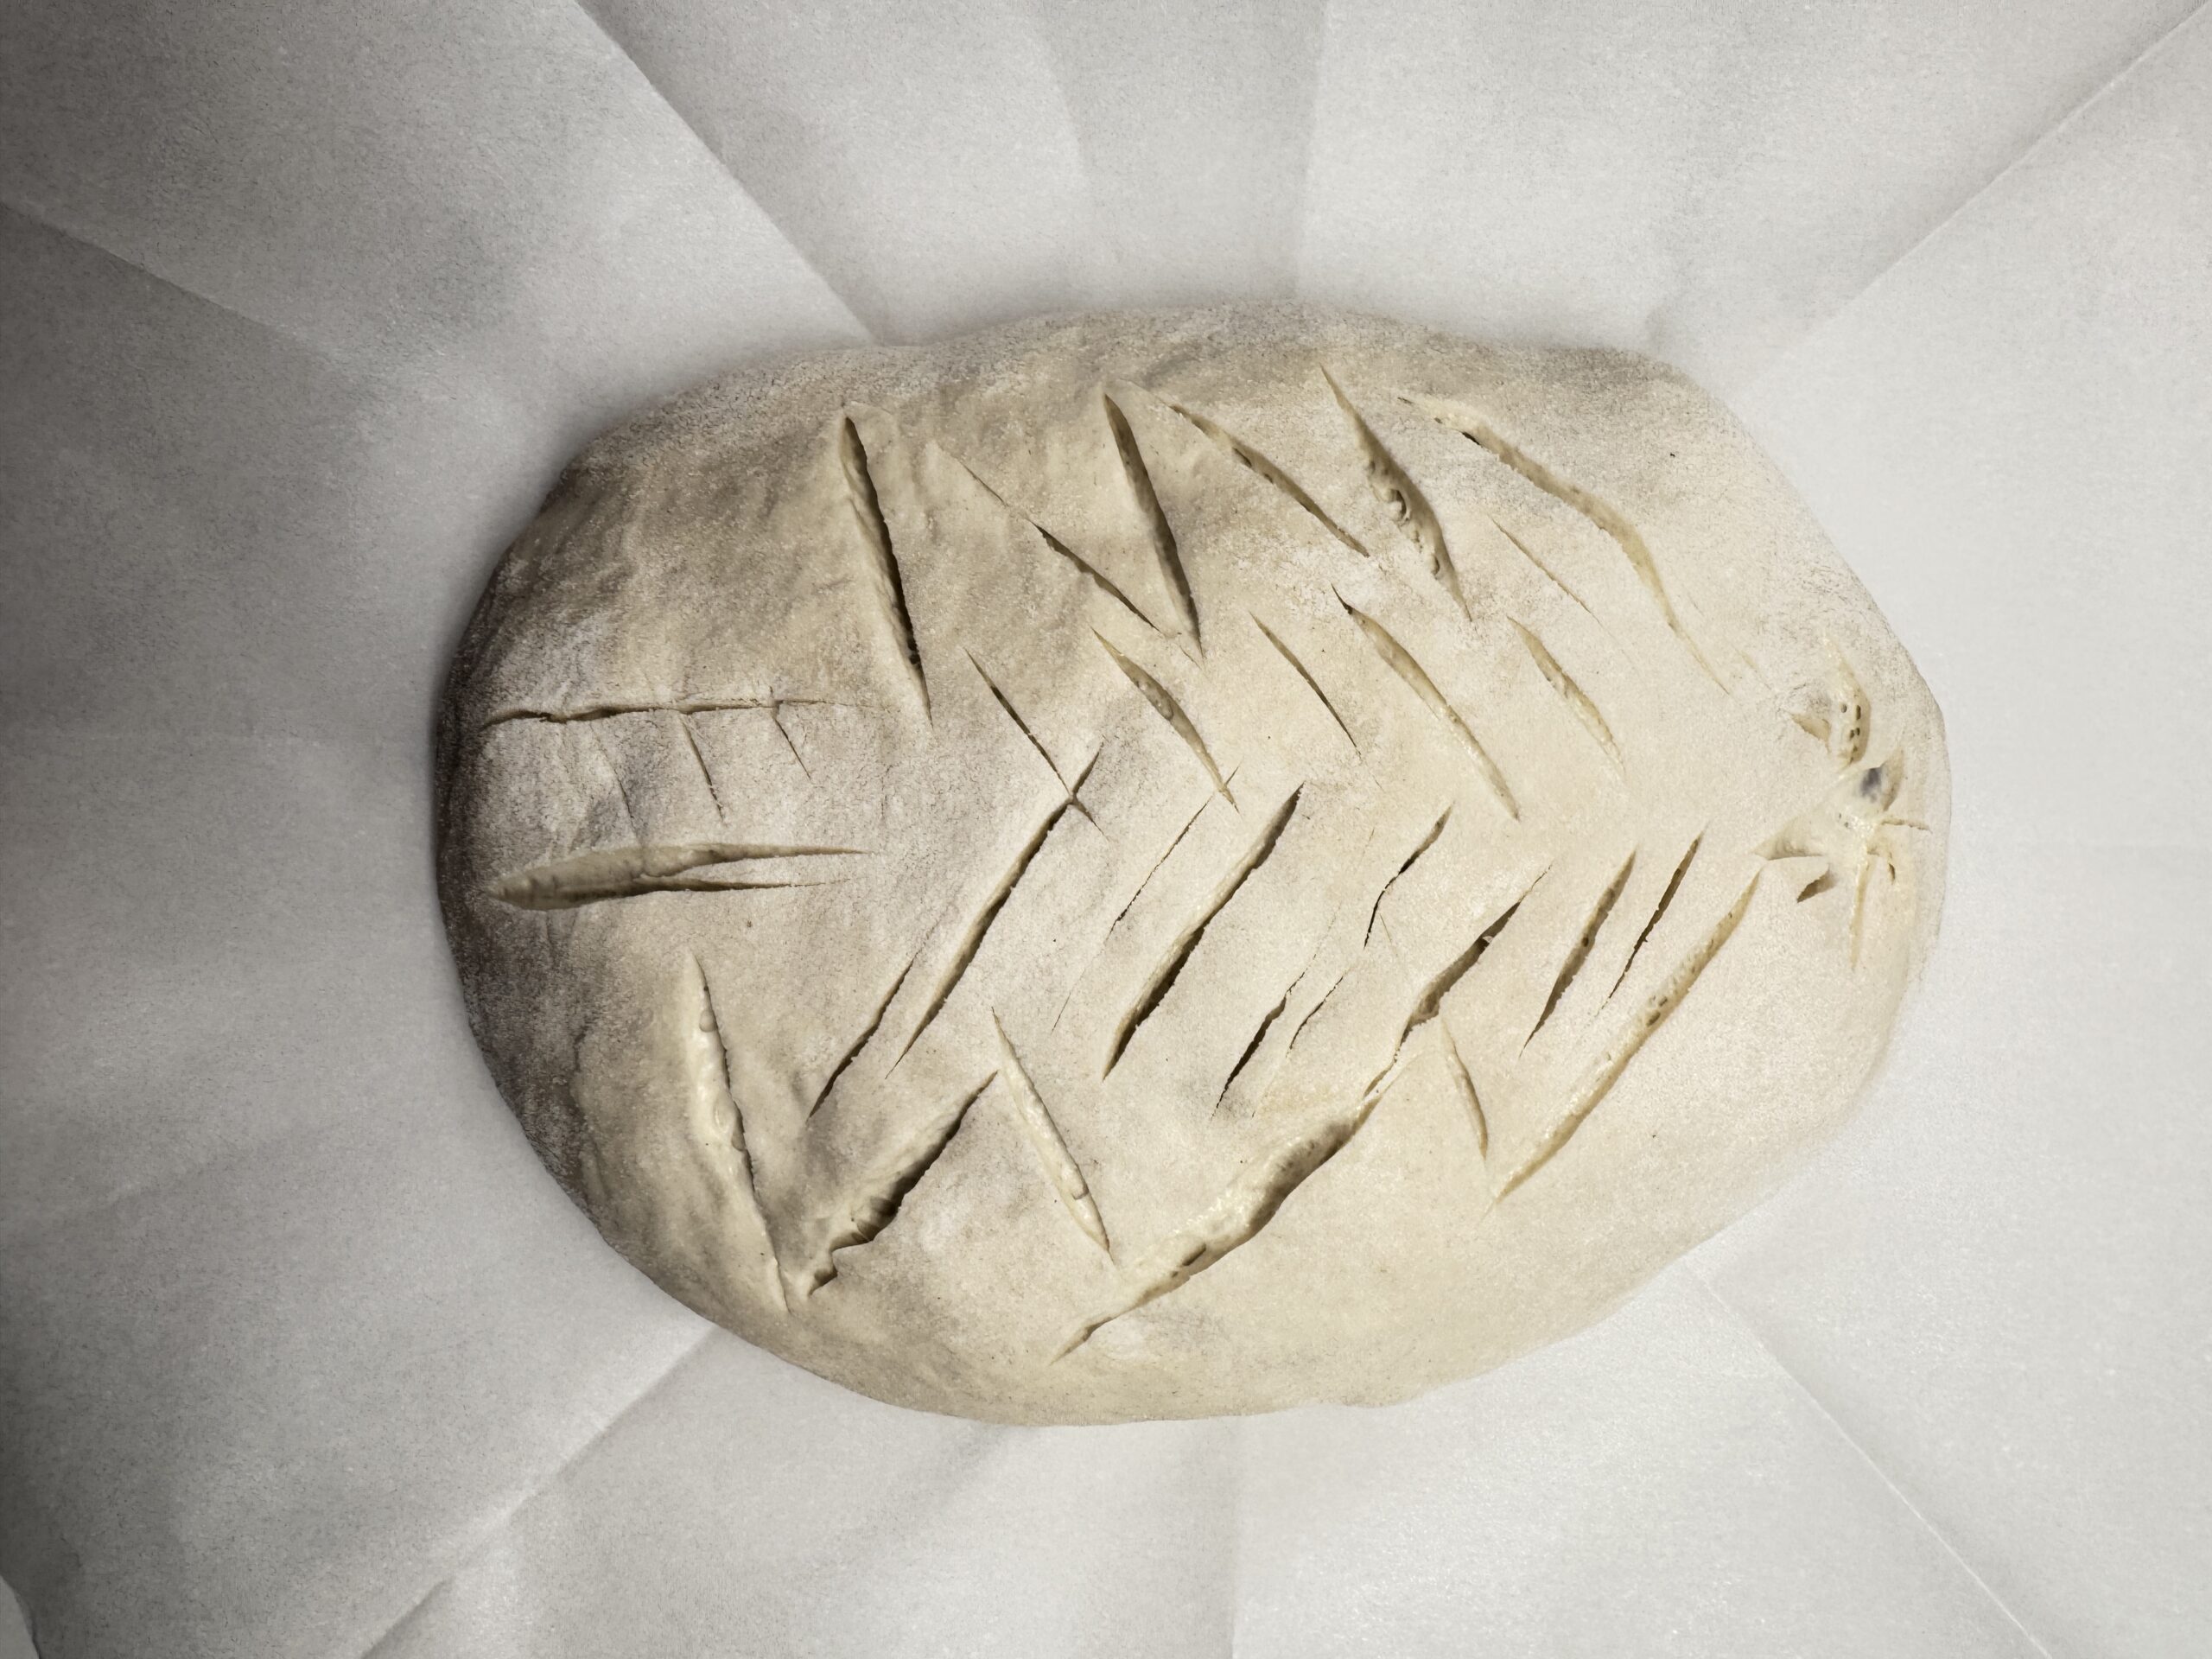
Place each loaf on a piece of parchment paper (slightly larger than the dough). Flip seam-side down, and score with a sharp knife or lame.
-
Lower loaves (with parchment) into the hot Dutch ovens. Cover and bake at 475°F for 30 minutes.
-
Remove lids, reduce oven to 425°F, and bake another 20–25 minutes until golden and hollow-sounding when tapped.
-
Cool on a cooling rack for at least 2 hours before slicing.

Tips for Best Results
-
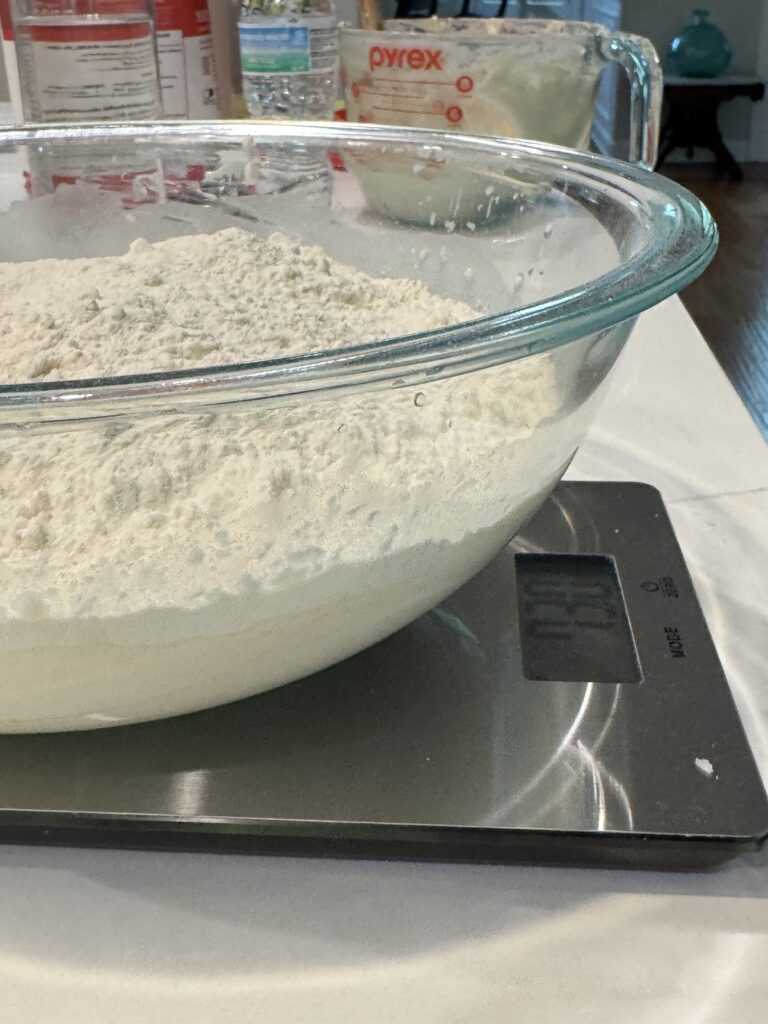
Use a kitchen scale for precision (measure in grams of flour, grams of water, and grams of starter).
-
The ambient temperature affects your dough. A warm place speeds up fermentation; a cooler space means more time.
-
A higher hydration dough can give a lighter open crumb, but may be harder to handle for your first time.
-
If short on time, a pinch of commercial yeast can help with the first rise, though purists recommend patience.
Storage & Freezing
-
Room Temperature: Store cooled loaves in a paper bag or wrapped in a tea towel inside a bread box for 2–3 days.
-
Freezer: Slice, wrap in parchment, and freeze up to 3 months. Toast slices straight from frozen for minimal effort.
-
Reviving: Sprinkle loaf with water, wrap in foil, and warm at 350°F for 10–15 minutes.
Ways to Serve Your Fresh Sourdough Bread
-
Slice and toast for breakfast with butter, jam, or avocado.
-
Grill slices brushed with olive oil for the perfect soup or salad side.
-
Make bruschetta with tomatoes, basil, and balsamic.
-
Use as hearty sandwich bread for bold fillings.
The Best Soups & Salads to Serve with Sourdough Bread
A fresh sourdough loaf is the perfect partner for a cozy soup or a crisp, refreshing salad. Here are some of our favorite pairings:
Soups to Pair with Sourdough
-
Panera 10 Vegetable Soup – Dip grilled sourdough slices brushed with olive oil into this hearty veggie-packed bowl.
-
Maple Bourbon Butternut Squash Soup – Serve with sourdough crostini topped with goat cheese and herbs for a sweet-and-savory combo.
-
French Onion Soup – Float a toasted slice of sourdough with melted Gruyère on top for the ultimate upgrade.
-
Vegetable Barley Soup – Thick slices of sourdough make the perfect side for this rustic, wholesome soup.
-
Turkish Red Lentil Soup – Pair with sourdough flatbread-style wedges brushed in olive oil and lightly charred.
-
Tomato Tortellini Soup with Kale – Dunk buttered sourdough garlic bread into this brothy, flavor filled soup.
-
Broccoli Cheese Soup – A chewy, crusty loaf balances out this rich, cheesy comfort soup.

Salads to Pair with Sourdough
-
California BLT Caesar Salad – Add grilled sourdough croutons brushed with olive oil for crunch.
-
Italian Salad – Serve with a warm sourdough slice rubbed with garlic and olive oil for an authentic touch.
-
Lettuce Salad with Shrimp – Pair with sourdough toast brushed with lemon olive oil to brighten the flavors.
-
Curried Quinoa Salad – Enjoy with toasted sourdough wedges to scoop up every bite.
-
Panera Poppy Seed Strawberry & Grilled Chicken Salad – Serve with lightly grilled sourdough drizzled with honey for a sweet pairing.

Be sure you have the time that it takes before you commit to this. This includes 5 hours available in your kitchen on day 1. This is only 15 minutes of active time. For those that work during the week, starting this on Saturday before noon is ideal! The results, will make you realize that the time invested is well worth it, when you butter that crunchy, chewy sourdough bread toast!

Equipment
- 3 large mixing bowl
- 1 Spatula
- 1 scale
- 2 cast iron dutch oven
- 2 Wire cooling rack
- lame
- 2 dish cloth
- banneton
Ingredients
- 270 grams sourdough starter
- 550 grams bottled water or filtered water
- 725 grams all-purpose flour We use King Arthur
- 20 grams flake sea salt
Instructions
Step 1:
- In a large bowl whisk sour dough starter and water until dissolved. Note, mixture may foam a little bit.270 grams sourdough starter, 550 grams bottled water
- Stir in flour with a spatula, until no dry flour remains.725 grams all-purpose flour
- Cover with a damp cotton dishcloth, and let sit for an hour
Step 2:
- After 1 hour, sprinkle the salt on top.20 grams flake sea salt
- Keep a bowl of filtered water near, to wet your hands with.
- Wet one hand with distilled water.
- Starting at 12 o’clock position, pick up the dough with your wet hand and fold down into the middle.
- Turn the bowl a quarter turn, & fold dough again.
- Do this 4 times, to complete the 12 o clock, 3 o clock, 6 o clock and 9 clock folds.
- Cover with moist towel, let sit for 30 minutes
- Note: keep track of times on a note pad, in order to mark off, each time you complete.
Step 3:
- Repeat step 2 five more times, for a total of 6 folds.
- Be sure to wet hand each time, with filtered water
- Cover each time, and let set for 30 minutes in between each of the 6 folds.
Step 4:
- Once you have done the 6thfold, cover with moist towel and let sit for 1 hour.
Step 5:
- Wipe the edges of the bowl with a paper towel to remove all the moisture.
- Cover with plastic wrap.
- Put in refrigerator overnight for at least 12 hours.
- Dough can stay in refrigerator up to 20 hours.
Step 6:
- Dump dough onto lightly floured surface.
- Using a bench scraper, cut the dough in half.
- Using floured hands, form the 2 halves into balls with the same process as day 1
- Fold the dough 4 times.
- Using hands, cup into a ball.
- Do not knead the dough.
- Let dough balls rest for 10 minutes.
- Place dough in a rice flour sprinkled proofing bowls
- If you do not have proofing bowls, line a glass bowl with a thin linen or cotton tea towel.
- Cover bowl with a lightly floured linen napkin or tea towel.
- Place in refrigerator for 4-5 hours.
Step 7:
- Place 2 oven proof Dutch ovens, with lids into oven on middle rack.
- If you have a pizza stone, place it on rack below (this helps retain heat).
- Heat oven to 500 degrees for a full hour
- While oven is warming, cut 2 parchment rounds, a little large than the bottom interior of the pots.
- Pull dough out of refrigerator.
- Dump each loaf of dough onto parchment round.
- Use a lame to cut the surface of the dough.
- If you don’t have a lame, you can use a razor blade
- Working quickly, pull both heated Dutch ovens out of the oven, closing door behind
- Pick up the dough by grabbing the parchment from each side, and drop carefully into each Dutch oven.
- Cover with lids, and return swiftly to hot oven.
- Bake at 475 F for 30 minutes with lids on.
- After 30 minutes, remove the lids, rotate pans ½ way.
- Reduce oven temperature to 425 F.
- Bake for another 20-25 minutes until loaves are golden brown.
- Bread is done when has a hollow sound when thumped.
- Cool for at least 2 hours before slicing, as dough continues to cook.
Oh this is my new favorite bread recipe!! Thank you for making it easy for me to make!
Ned,
My mom used to make these for us and the smell in the house when we make them reminds me of her,
Thank you,
Dina and Bruce